The first step will be a thorough washing of the headlight lenses with car soap and water. It might seem simple but if you follow those steps you should have cleaner headlights.
Clean the headlight lens.

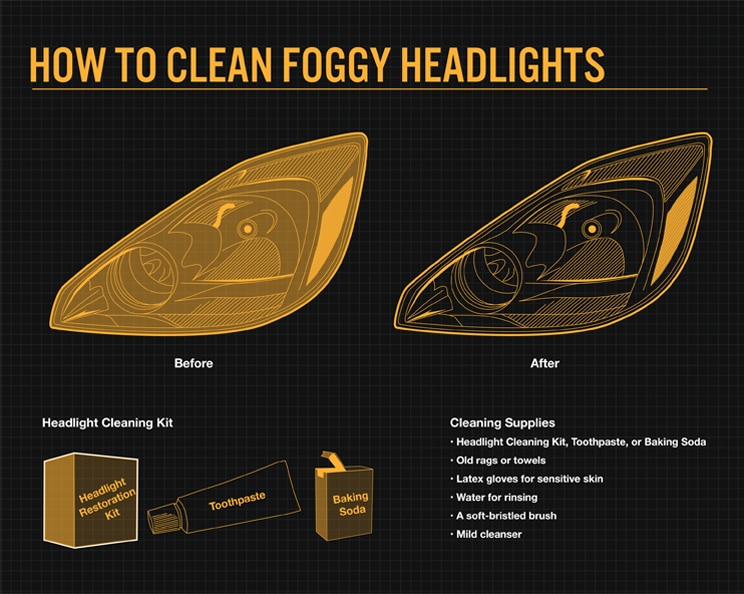
How to clean headlight lens. The best headlight lens restoration for cars and trucks offer long-lasting clear light from your headlights. The third image shows the headlight after sanding with a 3000-grit wet-sanding pad and then sealing the lens with the protectant. The lens will soon be covered in a rough dark yellow crusted surface.
Thats why keeping your headlights clean and clear is so important. Allow the polish to dry then use the clean end of the cloth to buff off any polish residue. Buff the area again and inspect.
Finding the best one is a little overwhelming. Tape around the headlight with the included green tape. You might want to wash the surrounding areas a bit too so that the tape will stick during the next step.
After successfully taking off the hood and headlight its time to clean it up. Rub toothpaste into the headlight lens with the toothbrush You can use a rotary buffer for a deeper clean Keep rubbing to scrub the lens housing clean. Repeat the polishing process.
Thoroughly clean headlight lens and use masking tape to protect nearby painted surfaces. Rinse headlights with clean water. Wipe it along the surface of the headlight and youll see it looking like new once again.
Cleaning the inside of a cars headlight can pose a bit of a challenge especially when they have their bulbs lens and reflector in a sealed housing. With the help of manual accomplish the task of taking off the lens. They allow you to see at night and be seen by other motorists.
The lens should look perfectly clear. Thats all youll need to clean plastic headlights. The Restoration Process Is Simple with the kit 3M 39045 Headlight Renewal Kit with Protectant 1.
First clean the headlights with Windex or soap and water. Various headlights may have various assemblies. If this seems to be the problem doing a cheap quick clean will be an effective way of slowing the degeneration of the headlights but a more comprehensive clean may be called for.
Scrub hazy headlight lens vigorously until the polish turns clear. Modern vehicles often use more plastic which discolors faster than glass sealed-beam units. Apply Lens Clarifying Compound to one lens at a time.
The headlight lens can become hazy or cloudy as the vehicle ages. Depending on the damage to the headlamp small areas may still appear foggy. Clean the headlights with soap and water.
You can use sandpaper but remember sandpaper scratches. Toothpaste with baking soda works best Start. If the headlight lens has light discoloration with no apparent scratches start with at 2500 grit.
With a headlight lens restorer the original power of your beam is guaranteed but only if you clean both the inside and the outer parts of your car headlights. Fold the paper towel twice and spray it twice with WD 40. Wipe off residue with a clean microfiber towel and inspect work.
If not fully clear apply included spray lube and use Restoration Pads on problem spots. Though acid rain salt grime extreme temperatures and other factors can also lead to lens degradation the suns UV rays are the biggest culprit. The problem is that there are a variety of different headlight lens restoration systems available.
Apply automotive polish - Apply automotive polish to another clean soft cloth and firmly rub the surface of each headlight in a circular manner adding more polish as needed. Remove the plastic headlight cover from the car and dip it into the bucket. If none of the homemade cleaners are working to your liking your best option is to buy a headlight lens restoration kit.
They are the eyes of your vehicle. Then using a soft cloth rub a fingertip amount of toothpaste onto the wet headlight. Without them youd be blind.
Spray headlights with cleaner - Generously spray your headlights with glass cleaner then wipe the surface clean with a soft cloth. Most headlight restoration kits include an abrasive compound and sandpaper in grades of varying roughness to remove the outer layer of yellowed oxidized plastic and clear the lens. Repeat until headlight is satisfactorily clear.
Begin by taping around the headlight ensuring that you get a tight seal between the headlight and the vehicles paint. Spray warm water onto the headlight and wipe away the toothpaste using the cloth. The above example headlight was thoroughly cleaned with a cleaning kit 14 months ago.
Be sure to keep the lens and sand paper wet at all times. Using the 400 grit sand paper drench the headlight lens with water and wet the sand paper. DIY Headlight Lens Restoration Kits Polishes Headlights dont get the credit they deserve.
For that purpose you have to take out the lens or headlight lens from the assembly. Best Headlight Restoration Kits. If your lens has heavysevere discoloration with apparent scratchesimperfections this requires a rougher grit sandpaper like the 600 grit.
Step 2- Take off the Lens Prepare the Solution. Try repolishing only those spots with polishing compound. When using vinegar to clear off headlights fill a large bucket full of vinegar.
Spread 3 - 6 dots of Headlight Restorer and Protectant over a microfiber towel or applicator pad. How to Clean a Foggy Headlight Lens Foggy headlight lenses are mainly caused by their constant exposure to ultra-violet UV radiation. Use Lens Sealing Wipe to add a protective layer.
Plan to spend at least five minutes on. With a clean microfiber cloth and two sprays of WD 40 you can make your headlights new again. Also the headlight will begin clouding up again in a matter of months.
Tips for Cleaning Tank Decorations. Its very difficult to completely remove soap and even a trace can be harmful to fish.

Save up to 15 on Premium Products when using Autoship.
/how-to-clean-a-dirty-fish-tank-1380968_V2-5b5f1fb4c9e77c0025da8aa1.png)
How to clean fish tank decorations. If youve placed decorations in your fish tank you need to clean. Remove the sediment with a soft brush on the items rinse with clean water for a few seconds till its clean. Fish are very easy pets to keep and an aquarium is a beautiful addition to a home.
Do not use soap or hot water when cleaning. Aquarium Lights and Algae. There is no substitute for this work and it is vital for making sure you have a clean healthy tank that is as algae-free as possible.
You can decorate the tank according to personal preference. A set of decorations with vibrant colors it is vividly and colorful to add lively and natural life to your tank. Adding decorations to your bettas tank is the simplest way to spice things up for your fish.
Remove your fish from the tank. Fill a clean container as close to the size of your fish tank as possible with non-chlorinated water. Add 1 teaspoon of aquarium salt for ever 2 gallons of water 6.
You may need to top off the tank with prepared water frequently. Use an aquarium vacuum to clean the gravel and a sponge or scraper to remove excess algae from decorations. Scrub brushes with bristles soft pad scrub pads and a gravel wash kit are a few of the items that I would recommend.
Be sure to get items that go with your tank and keep in mind that acrylic scratches much more easily than glass so never use a rough brush or pad on. The tiny recliners coffee table lamp and even TV this fish tank will be amazing if you can find an antique TV to put your tank in decorated the way it is in the picture. Cleaning an aquarium isnt difficult especially if you make sure to do it on a schedule so algae-causing nutrients dont have time to build up.
Once the inside glass is clean remove rocks artificial plants and decorations that have significant algae growth or are noticeably dirtyDo not clean them with soap or detergents. Anything that you put into your aquarium could have an impact on your water chemistry and water quality. Our fish tank decorations plants are made of high-quality materials that are safe to all fish and their environment they are excellent choice for aquarium lovers.
Remove any debris from the tank and use vinegar and kitchen roll to clean the tank. Clean the tank gently. So if your betta tank is currently devoid of any accessories check out our suggestions in the next section of this article.
Monthly you need to roll up your sleeves and vacuum the substrate clean off the decorations clean the filter and scrape the algae off the glass. Betta fish love to explore caves and. Clean inside glass too.
Be careful doing this if youve bought an acrylic tank. This can be deadly to your fish. If you have a single small fish such as a goldfish or a betta it is easier to remove it from the tank for gravel cleaning.
Inexpensive fish aquarium decor displays your creativity and passion for your collection of fish. Aquarium Decorations Brighten a Plain Fish Tank. If youve bought a used tank youll need to give it a bit more attention.
Rinse and Repeat daily until this illness is gone. Ok so really what we would say is a betta fish need 5 gallons of personal space before another fish is put into the tank then that fish will need some personal space too depending on species. You can then add layers of substrate to your clean fish tank.
No betta fish should live in a tank that has no decorations or plants. If you want to clean any of the other larger decorations youve removed from step two you can do this in the bucket of siphoned out water. The fish tanks plants will neither fade nor create pollution to the water which will provide a comfortable and clean living environment for the fish.
Made your aquarium a beautiful scenery. Use a drinking glass or a fish net to gently move your fish from the tank to the container. Ensure your fish are happy and healthy by keeping their tank clean and properly filled with water.
Cleaning Decorations and Rocks. Monthly If your aquarium is established and the fish are healthy water only needs to be tested once per month for nitrate ammonia and pH levels. 5 Gallon is a very borderline tank for a betta fish to share depending on its own temperament it may be fine.
Even if you cant finding or making small chairs tables and couches will be cute enough on its own for your fishs literal home. Free shipping on orders over 25. Do a 30 water change EVERY DAY 3.
Raise the temperature in the 80s 4. You are going to need some basic tools to clean your tank and decorations. Add the dosage of Quick Cure product 5.
Use a colander to rinse the gravel and rocks until the water runs through clear and free of debris. That means that if you clean your tank decorations with soap and dont rinse them properly the soap could change the conditions in your tank and it might have a negative impact on your fish. Using a clean soft-bristled toothbrush.
By purchasing fish tank items for sale on eBay aquarium toys delight your fish and you too as your colorful collection lives its life before your eyes. However fish tanks need to be maintained in order to stay healthy and keep looking good. Clean both the outside and the inside of your tank.
Youll also need to make sure you clean everything well so you dont introduce any contaminants into your tank. All the fish tank ornaments rocks and coral to create a fun and stimulating environment for your fish. Never use soap or other cleaning products.
Thoroughly rinse off your chosen substrate gravel aquarium rocks sand etc and any other tank decorations with warm water.
Featured Post
wonderful quotes from it's a wonderful life
The 50 Most Wonderful Quotes from It's a Wonderful Life . Zuzu Bailey quotes 1. "Every time a bell rings, an angel gets his w...

