The first step will be a thorough washing of the headlight lenses with car soap and water. It might seem simple but if you follow those steps you should have cleaner headlights.
Clean the headlight lens.

How to clean headlight lens. The best headlight lens restoration for cars and trucks offer long-lasting clear light from your headlights. The third image shows the headlight after sanding with a 3000-grit wet-sanding pad and then sealing the lens with the protectant. The lens will soon be covered in a rough dark yellow crusted surface.
Thats why keeping your headlights clean and clear is so important. Allow the polish to dry then use the clean end of the cloth to buff off any polish residue. Buff the area again and inspect.
Finding the best one is a little overwhelming. Tape around the headlight with the included green tape. You might want to wash the surrounding areas a bit too so that the tape will stick during the next step.
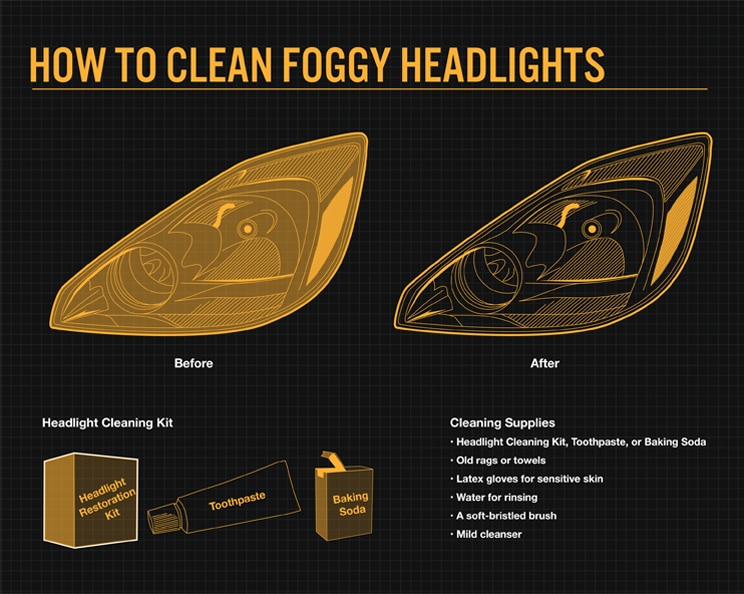
After successfully taking off the hood and headlight its time to clean it up. Rub toothpaste into the headlight lens with the toothbrush You can use a rotary buffer for a deeper clean Keep rubbing to scrub the lens housing clean. Repeat the polishing process.
Thoroughly clean headlight lens and use masking tape to protect nearby painted surfaces. Rinse headlights with clean water. Wipe it along the surface of the headlight and youll see it looking like new once again.
Cleaning the inside of a cars headlight can pose a bit of a challenge especially when they have their bulbs lens and reflector in a sealed housing. With the help of manual accomplish the task of taking off the lens. They allow you to see at night and be seen by other motorists.
The lens should look perfectly clear. Thats all youll need to clean plastic headlights. The Restoration Process Is Simple with the kit 3M 39045 Headlight Renewal Kit with Protectant 1.
First clean the headlights with Windex or soap and water. Various headlights may have various assemblies. If this seems to be the problem doing a cheap quick clean will be an effective way of slowing the degeneration of the headlights but a more comprehensive clean may be called for.
Scrub hazy headlight lens vigorously until the polish turns clear. Modern vehicles often use more plastic which discolors faster than glass sealed-beam units. Apply Lens Clarifying Compound to one lens at a time.
The headlight lens can become hazy or cloudy as the vehicle ages. Depending on the damage to the headlamp small areas may still appear foggy. Clean the headlights with soap and water.
You can use sandpaper but remember sandpaper scratches. Toothpaste with baking soda works best Start. If the headlight lens has light discoloration with no apparent scratches start with at 2500 grit.
With a headlight lens restorer the original power of your beam is guaranteed but only if you clean both the inside and the outer parts of your car headlights. Fold the paper towel twice and spray it twice with WD 40. Wipe off residue with a clean microfiber towel and inspect work.
If not fully clear apply included spray lube and use Restoration Pads on problem spots. Though acid rain salt grime extreme temperatures and other factors can also lead to lens degradation the suns UV rays are the biggest culprit. The problem is that there are a variety of different headlight lens restoration systems available.
Apply automotive polish - Apply automotive polish to another clean soft cloth and firmly rub the surface of each headlight in a circular manner adding more polish as needed. Remove the plastic headlight cover from the car and dip it into the bucket. If none of the homemade cleaners are working to your liking your best option is to buy a headlight lens restoration kit.
They are the eyes of your vehicle. Then using a soft cloth rub a fingertip amount of toothpaste onto the wet headlight. Without them youd be blind.
Spray headlights with cleaner - Generously spray your headlights with glass cleaner then wipe the surface clean with a soft cloth. Most headlight restoration kits include an abrasive compound and sandpaper in grades of varying roughness to remove the outer layer of yellowed oxidized plastic and clear the lens. Repeat until headlight is satisfactorily clear.
Begin by taping around the headlight ensuring that you get a tight seal between the headlight and the vehicles paint. Spray warm water onto the headlight and wipe away the toothpaste using the cloth. The above example headlight was thoroughly cleaned with a cleaning kit 14 months ago.
Be sure to keep the lens and sand paper wet at all times. Using the 400 grit sand paper drench the headlight lens with water and wet the sand paper. DIY Headlight Lens Restoration Kits Polishes Headlights dont get the credit they deserve.
For that purpose you have to take out the lens or headlight lens from the assembly. Best Headlight Restoration Kits. If your lens has heavysevere discoloration with apparent scratchesimperfections this requires a rougher grit sandpaper like the 600 grit.
Step 2- Take off the Lens Prepare the Solution. Try repolishing only those spots with polishing compound. When using vinegar to clear off headlights fill a large bucket full of vinegar.
Spread 3 - 6 dots of Headlight Restorer and Protectant over a microfiber towel or applicator pad. How to Clean a Foggy Headlight Lens Foggy headlight lenses are mainly caused by their constant exposure to ultra-violet UV radiation. Use Lens Sealing Wipe to add a protective layer.
Plan to spend at least five minutes on. With a clean microfiber cloth and two sprays of WD 40 you can make your headlights new again. Also the headlight will begin clouding up again in a matter of months.
ads
Pages
Search This Blog
Labels
- 11 digit vin ford truck ford vin decoder chart (1)
- 11 digit vin ford vin decoder chart (2)
- 17 digit ford vin decoder chart (2)
- 1950 chevrolet vin decoder (1)
- 1958 (1)
- 1966 (1)
- 1970 gmc vin decoder (1)
- 1979 chevrolet vin decoder (2)
- 1987 (1)
- 1988 (1)
- 1989 (2)
- 1991 (1)
- 1992 (2)
- 1994 (1)
- 1995 (2)
- 1996 (2)
- 1997 (1)
- 1997 ford vin decoder chart (2)
- 1998 (1)
- 1999 (2)
- 2000 (10)
- 2000 ford focus check engine light (2)
- 2001 (6)
- 2002 (7)
- 2002 honda accord check engine light reset (1)
- 2002 honda civic check engine light blinking (1)
- 2002 honda civic check engine light reset (1)
- 2002 toyota tacoma check engine light codes (1)
- 2002 toyota tacoma check engine light flashing (1)
- 2003 (3)
- 2003 honda civic paint code location (2)
- 2003 honda civic transmission problems (1)
- 2004 (2)
- 2004 jeep grand cherokee check engine light (1)
- 2004 jeep grand cherokee check engine light codes (1)
- 2004 jeep grand cherokee check engine light flashing (2)
- 2004 jeep grand cherokee check engine light reset (1)
- 2005 (4)
- 2005 ford escape check engine light (1)
- 2005 ford escape check engine light codes (1)
- 2005 ford escape check engine light flashing (1)
- 2005 ford escape check engine light reset (1)
- 2005 honda civic paint code location (1)
- 2005 honda pilot check engine light vtm-4 (1)
- 2005 jeep grand cherokee check engine light codes (1)
- 2005 nissan altima check engine light (1)
- 2005 nissan altima check engine light flashing (1)
- 2005 toyota corolla check engine light (1)
- 2005 toyota corolla check engine light codes (1)
- 2005 toyota corolla check engine light flashing (1)
- 2005 toyota corolla check engine light gas cap (1)
- 2005 toyota corolla check engine light reset (2)
- 2006 (1)
- 2006 chrysler 300 check engine light (1)
- 2006 chrysler 300 check engine light and lightning bolt (1)
- 2006 chrysler 300 check engine light reset (2)
- 2006 honda civic check engine light (1)
- 2006 honda civic check engine light codes (1)
- 2006 honda civic check engine light flashing (2)
- 2006 honda civic check engine light on no codes (1)
- 2006 honda civic check engine light reset (1)
- 2006 honda crv check engine light reset (1)
- 2006 honda pilot dashboard warning lights symbols (1)
- 2007 (4)
- 2007 acura tl check engine light (1)
- 2007 honda accord check engine light (1)
- 2007 honda accord check engine light comes on and off (1)
- 2007 honda accord check engine light flashing (1)
- 2007 honda civic paint code location (1)
- 2007 honda crv check engine light (1)
- 2007 honda crv check engine light codes (1)
- 2007 honda crv check engine light reset (1)
- 2007 honda crv vsa and check engine light (2)
- 2007 honda fit check engine light (1)
- 2007 honda odyssey check engine light (1)
- 2007 honda odyssey check engine light blinking (1)
- 2007 nissan altima check engine light (1)
- 2007 toyota camry check engine light reset (1)
- 2008 ford escape check engine light (1)
- 2008 ford escape check engine light blinking (1)
- 2008 ford escape check engine light codes (1)
- 2008 ford escape check engine light flashing (1)
- 2008 ford escape check engine light reset (1)
- 2008 honda accord check engine light (1)
- 2008 honda accord check engine light flashing (2)
- 2008 honda accord check engine light reset (2)
- 2008 honda accord check engine light/vsa (1)
- 2008 honda accord vsa and check engine light on (1)
- 2008 honda civic check engine light (1)
- 2008 honda civic check engine light and drive light flashing (1)
- 2008 honda civic check engine light blinking (2)
- 2008 honda civic check engine light blinking d (3)
- 2008 honda civic check engine light flashing (1)
- 2008 honda civic hybrid check engine light (2)
- 2008 honda odyssey check engine light (1)
- 2008 honda odyssey check engine light vsa (1)
- 2008 nissan altima check engine light (1)
- 2008 nissan altima check engine light flashing (1)
- 2008 nissan rogue transmission problems (1)
- 2009 honda accord check engine light (1)
- 2009 honda accord check engine light flashing (1)
- 2009 honda accord check engine light vsa (1)
- 2009 honda civic check engine light and drive light blinking (1)
- 2009 honda civic paint code location (1)
- 2009 nissan altima check engine light (1)
- 2010 honda accord check engine light codes (1)
- 2010 honda accord check engine light reset (1)
- 2010 honda civic check engine light (1)
- 2010 honda civic check engine light codes (2)
- 2010 honda civic check engine light reset (1)
- 2010 honda civic paint code location (2)
- 2010 honda cr v dashboard warning lights symbols (1)
- 2010 hyundai elantra check engine light reset (1)
- 2010 nissan altima check engine light (1)
- 2010 nissan altima check engine light reset (1)
- 2011 ford escape check engine light gas cap (1)
- 2011 gmc acadia check engine light flashing fast (1)
- 2011 honda accord check engine light (2)
- 2011 honda accord check engine light flashing (2)
- 2011 honda crv check engine light (1)
- 2011 honda pilot check engine light (1)
- 2011 honda pilot check engine light blinking (1)
- 2011 honda pilot check engine light drive light flashing (1)
- 2011 honda pilot check engine light flashing (1)
- 2011 honda pilot check engine light flashing d (1)
- 2011 honda pilot check engine light reset (2)
- 2011 honda pilot check engine light vtm-4 (1)
- 2011 honda pilot check engine light vtm-4 vsa (2)
- 2011 hyundai sonata check engine light flashing (1)
- 2011 hyundai sonata check engine light reset (1)
- 2012 ford f150 o2 sensor bank 2 sensor 1 location (1)
- 2012 ford fiesta check engine light (1)
- 2012 ford focus check engine light (1)
- 2012 ford focus check engine light codes (1)
- 2012 ford fusion check engine light (1)
- 2012 ford fusion check engine light reset (1)
- 2012 honda cr v dashboard warning lights symbols (1)
- 2012 jeep grand cherokee check engine light (1)
- 2012 jeep grand cherokee check engine light came on (1)
- 2012 jeep grand cherokee check engine light codes (2)
- 2012 jeep grand cherokee check engine light flashing (1)
- 2012 jeep grand cherokee check engine light reset (1)
- 2012 nissan altima check engine light (1)
- 2012 nissan rogue check engine light (1)
- 2012 nissan versa check engine light (1)
- 2012 nissan versa check engine light no codes (1)
- 2012 nissan versa check engine light reset (1)
- 2012 toyota camry check engine light (1)
- 2012 toyota camry check engine light and traction light (2)
- 2012 toyota camry check engine light reset (1)
- 2013 chevy malibu check engine light (1)
- 2013 chevy malibu check engine light codes (1)
- 2013 chevy malibu check engine light engine power reduced (2)
- 2013 chevy malibu check engine light reset (1)
- 2013 dodge journey battery replacement (1)
- 2013 honda accord check engine light (1)
- 2013 honda accord check engine light codes (1)
- 2013 honda accord check engine light reset (2)
- 2013 honda civic paint code location (1)
- 2013 kia forte check engine light (2)
- 2014 chevy cruze check engine light blinking (1)
- 2014 chevy cruze check engine light on and off (1)
- 2014 chevy cruze check engine light reset (1)
- 2014 honda accord check engine light (2)
- 2014 honda accord check engine light reset (1)
- 2014 honda civic paint code location (2)
- 2014 honda pilot dashboard warning lights symbols (1)
- 2014 jeep grand cherokee check engine light (1)
- 2014 jeep grand cherokee check engine light after oil change (1)
- 2014 jeep grand cherokee check engine light codes (1)
- 2014 jeep grand cherokee check engine light flashing (1)
- 2014 jeep grand cherokee check engine light gas cap (1)
- 2014 jeep grand cherokee check engine light reset (2)
- 2014 kia soul check engine light (1)
- 2014 kia soul check engine light flashing (1)
- 2014 kia soul check engine light reset (1)
- 2014 nissan altima check engine light (1)
- 2015 chevy equinox check engine light on and stalling (1)
- 2015 chrysler 200 check engine light after changing battery (1)
- 2015 chrysler 200 check engine light code (1)
- 2015 chrysler 200 check engine light reset (1)
- 2015 ford fiesta check engine light (2)
- 2015 ford focus check engine light (2)
- 2015 ford focus check engine light reset (1)
- 2015 honda civic transmission problems (1)
- 2015 jeep grand cherokee check engine light (1)
- 2015 jeep grand cherokee check engine light code p0456 (1)
- 2015 jeep grand cherokee check engine light codes (2)
- 2015 jeep grand cherokee check engine light evap (2)
- 2015 jeep grand cherokee check engine light flashing (1)
- 2015 jeep grand cherokee check engine light gas cap (1)
- 2015 jeep grand cherokee check engine light oil change (1)
- 2015 jeep grand cherokee check engine light reset (1)
- 2015 nissan altima check engine light (2)
- 2015 nissan altima check engine light reset (2)
- 2015 nissan sentra check engine light (1)
- 2015 nissan sentra check engine light code p0101 (1)
- 2015 nissan sentra check engine light reset (1)
- 2015 toyota corolla check engine light (1)
- 2015 toyota corolla check engine light and trac off (2)
- 2015 toyota corolla check engine light reset (1)
- 2016 chevy cruze check engine light (1)
- 2016 chevy cruze check engine light emissions (2)
- 2016 chevy cruze check engine light goes on and off (1)
- 2016 dodge journey battery replacement (2)
- 2016 ford explorer check engine light reset (1)
- 2016 gmc sierra check engine light flashing (1)
- 2016 gmc sierra check engine light reset (1)
- 2016 honda civic battery replacement (1)
- 2016 hyundai sonata check engine light blinking (1)
- 2016 kia optima key fob battery replacement (1)
- 2016 nissan rogue transmission problems (2)
- 2017 chevy malibu check engine light (1)
- 2017 chevy malibu check engine light emissions (2)
- 2017 chevy malibu check engine light reduced engine power (2)
- 2017 chevy malibu check engine light reset (1)
- 2017 chevy sonic check engine light (1)
- 2017 chevy sonic check engine light reset (2)
- 2017 dodge journey battery replacement (1)
- 2017 ford escape check engine light (1)
- 2017 ford escape check engine light codes (1)
- 2017 ford escape check engine light flashing (2)
- 2017 ford escape check engine light on and off (1)
- 2017 ford escape check engine light reset (1)
- 2017 ford focus check engine light (2)
- 2017 ford focus check engine light reset (1)
- 2017 ford fusion check engine light (1)
- 2017 ford fusion check engine light reset (2)
- 2017 hyundai elantra check engine light comes on and off (1)
- 2017 hyundai elantra check engine light when accelerating (1)
- 2017 jeep cherokee check engine light (1)
- 2017 jeep cherokee check engine light after battery replacement (1)
- 2017 nissan sentra check engine light reset (1)
- 2017 toyota rav4 check engine light (1)
- 2017 vw key fob battery replacement (2)
- 2017 vw passat key fob battery replacement (1)
- 2018 ford f150 check engine light reset (1)
- 2018 ford f150 oil change (1)
- 2018 ford f150 oil change cost (1)
- 2018 ford f150 oil change indicator (2)
- 2018 ford f150 oil change interval (1)
- 2018 ford f150 oil change reset (1)
- 2018 ford f150 oil change schedule (1)
- 2018 honda accord paint code location (1)
- 2018 honda civic key fob battery replacement (1)
- 2018 honda civic paint code location (1)
- 2018 vw touareg key fob battery replacement (1)
- 2019 vw key fob battery replacement (2)
- 2019 vw tiguan key fob battery replacement (1)
- 2020 gmc vin decoder chart (1)
- 300zx (1)
- accent (1)
- accord (9)
- accurate (1)
- actresses (1)
- acura (1)
- acura mdx check engine light reset (1)
- acura tl check engine light on and off (1)
- acura transmission problems rdx (1)
- acura vin decoder color (1)
- airbrush (1)
- alfa romeo check engine light (1)
- alfa romeo check engine light comes (1)
- all check engine light meaning (1)
- altima (3)
- aluminum (1)
- antifreeze (2)
- assembly (1)
- aston martin vin decoder (1)
- audi a4 b6 obd2 port location (1)
- audi a4 check engine light gas cap (1)
- audi a5 convertible problems (2)
- audi a6 check engine light flashing car shaking (1)
- audi dashboard warning lights meaning (1)
- audi q5 check engine light flashing (1)
- audi q5 check engine light gas cap (1)
- audi q5 check engine light keeps coming on (1)
- audi q7 check engine light reset (1)
- audi transmission problems (1)
- audi tt check engine light reset (1)
- audi tt obd2 port location (2)
- audi vin decoder (1)
- audi vin decoder build date (1)
- audi vin decoder build sheet (2)
- audi vin decoder color code (1)
- audi vin decoder engine code (2)
- audi vin decoder forum (1)
- audi vin decoder free (2)
- audi vin decoder options (1)
- audi vin decoder spec (2)
- audi vin decoder spec uk (1)
- audi vin decoder specifications (2)
- audi vin decoder window sticker (1)
- automotive (1)
- axle (1)
- aztek (1)
- bad wheel bearing symptoms reddit (1)
- bad wheel bearing symptoms silverado (1)
- based (1)
- battery (4)
- battery and charging system tester (1)
- beetle (2)
- belt (5)
- best noco jump starter (1)
- blades (1)
- block (1)
- blow (1)
- blown (1)
- bmw 318i e90 common problems (1)
- bmw 320i e90 common problems (1)
- bmw abs wheel speed sensor (1)
- bmw brake hose replacement cost (1)
- bmw check engine light codes (2)
- bmw check engine light meme (1)
- bmw check engine light symbol (1)
- bmw code scanner (1)
- bmw code scanner app (1)
- bmw common problems (1)
- bmw common problems 3 series (1)
- bmw diagnostic scanner tool (1)
- bmw e39 common problems (1)
- bmw e46 common problems (1)
- bmw e60 common problems (1)
- bmw e93 convertible problems (1)
- bmw electronic parking brake malfunction (1)
- bmw i8 common problems (1)
- bmw increased battery discharge reset (1)
- bmw increased battery discharge warning (1)
- bmw increased battery discharge when stationary (1)
- bmw increased battery discharge when stationary. electrical consumers were temporarily switched off (1)
- bmw increased battery discharge while stationary (1)
- bmw navigation keeps rebooting (1)
- bmw obd scanner android (1)
- bmw obd scanner software (1)
- bmw obd2 scanner app (1)
- bmw obd2 scanner software (1)
- bmw restraint system malfunction battery (1)
- bmw restraint system malfunction recall (1)
- bmw scanner 1.4.0 software download (1)
- bmw scanner 1.4.0 windows 10 drivers (1)
- bmw sos call system malfunction reset (1)
- bmw transmission problems 5 series (1)
- bmw vin decoder build sheet uk (1)
- bmw vin decoder forum 2020 (1)
- bmw vin decoder options free (1)
- bmw vin decoder options uk (1)
- bmw wont start but everything else works (1)
- bmw wont start but has power (1)
- bmw wont start just clicks (1)
- bmw wont start no power (1)
- bmw wont start when cold (1)
- body check engine light meme (1)
- boosting (1)
- boot (1)
- born (1)
- brackets (1)
- brake (6)
- brakes (1)
- briggs (1)
- bubbled (1)
- buick (5)
- buick encore check engine light flashing (1)
- buick lacrosse check engine light (1)
- buick lacrosse check engine light flashing (2)
- buick vin decoder build sheet (1)
- buick vin decoder options (1)
- bulb (3)
- bumper (1)
- bushings (1)
- buy cheap car battery (1)
- buy cheap car battery near me (1)
- buy cheap car battery online (2)
- cabin (1)
- cadillac (3)
- cadillac vin number decoder (1)
- calipers (1)
- camry (1)
- camshaft (1)
- car check engine light meme (1)
- car dashboard check engine light symbol meaning (1)
- car dashboard honda dashboard warning lights symbols (1)
- car jack types pictures (1)
- Car Repair (182)
- car shaking when accelerating after snow (1)
- car shaking when accelerating and idle (1)
- car shaking when accelerating uphill (1)
- car shaking when braking (1)
- car shaking when braking and accelerating (1)
- car shaking when braking and idling (1)
- car shaking when braking at high speeds (1)
- car shaking when braking at speed (1)
- car shaking when braking downhill (1)
- car shaking when braking reddit (1)
- car shaking when idle after oil change (1)
- car shaking while driving engine light on (1)
- car shaking while driving in winter (1)
- car won't start after accident (1)
- car won't start just clicks and lights flash (1)
- car won't start just clicks but lights work (1)
- car won't start just clicks once (1)
- car won't start just clicks once but battery is good (2)
- car won't start just clicks once but lights work (2)
- car won't start just clicks when i turn the key (1)
- caravan (1)
- carpet (2)
- cars (2)
- cart (1)
- case (1)
- catalytic (2)
- catalytic converter glowing red hot and sputtering (1)
- cavalier (2)
- center (1)
- century (4)
- change (3)
- change acura key fob battery (1)
- change battery in toyota key fob (1)
- change battery in toyota key fob 2016 (1)
- change cabin air filter hyundai elantra 2013 (1)
- change engine air filter honda civic (1)
- change volvo key fob battery (1)
- changes (1)
- charge (1)
- charging (1)
- charging system test autozone (1)
- charging system tester harbor freight (1)
- charging system tester with amp clamp (1)
- check (2)
- check bmw coolant level (1)
- check engine light bmw (1)
- check engine light bmw 325i (1)
- check engine light bmw 328i (1)
- check engine light bmw 328i 2015 (1)
- check engine light bmw 335i (2)
- check engine light bmw e46 (1)
- check engine light bmw e90 (2)
- check engine light bmw x5 (2)
- check engine light bmw x5 2007 (1)
- check engine light bmw x5 diesel (2)
- check engine light chrysler 200 (1)
- check engine light dodge caravan (2)
- check engine light dodge caravan 2013 (1)
- check engine light dodge caravan 2014 (2)
- check engine light dodge caravan 2015 (1)
- check engine light dodge caravan 2016 (2)
- check engine light dodge caravan 2019 (1)
- check engine light flashing (1)
- check engine light flashing then solid (1)
- check engine light flashing then stops (2)
- check engine light flashing then stops when accelerating (1)
- check engine light flashing when accelerating (1)
- check engine light ford focus (1)
- check engine light ford focus 2006 (1)
- check engine light ford focus 2009 (1)
- check engine light ford focus 2013 (2)
- check engine light ford focus 2014 (1)
- check engine light ford focus 2016 (1)
- check engine light honda (1)
- check engine light honda accord (2)
- check engine light honda accord 2002 (2)
- check engine light honda accord 2008 (2)
- check engine light honda accord 2012 (2)
- check engine light honda accord 2013 (2)
- check engine light honda civic (1)
- check engine light honda crv (1)
- check engine light honda element (1)
- check engine light honda fit (2)
- check engine light honda fit 2008 (2)
- check engine light honda fit 2009 (1)
- check engine light honda fit 2015 (1)
- check engine light honda fit 2016 (1)
- check engine light honda fit 2017 (2)
- check engine light honda pilot 2006 (1)
- check engine light lexus rx330 (2)
- check engine light lexus rx350 (1)
- check engine light meaning jeep grand cherokee (1)
- check engine light meaning nissan altima (1)
- check engine light meaning toyota (1)
- check engine light meaning toyota corolla (1)
- check engine light meme (1)
- check engine light meme girls (1)
- check engine light meme leonardo (1)
- check engine light mitsubishi outlander (1)
- check engine light on bmw 335i (1)
- check engine light on bmw x1 (1)
- check engine light on chevy equinox (1)
- check engine light on chevy equinox 2010 (1)
- check engine light on chevy equinox 2012 (2)
- check engine light on chevy equinox 2016 (2)
- check engine light on gmc sierra 1500 (2)
- check engine light on honda accord 2013 (1)
- check engine light on honda crv (1)
- check engine light on honda crv 2005 (1)
- check engine light on honda crv 2011 (1)
- check engine light on nissan sentra 2012 (1)
- check engine light on toyota camry 2006 (1)
- check engine light on toyota camry 2017 (1)
- check engine light on toyota camry hybrid (1)
- check engine light toyota corolla (1)
- check engine light toyota corolla 2018 (1)
- check engine light toyota diagnostic trouble codes manual (1)
- check engine light toyota rav4 2018 (1)
- check engine light toyota toyota diagnostic trouble codes manual pdf (2)
- check engine spark (1)
- check engine spark plugs (2)
- cherokee (3)
- chevrolet (1)
- chevrolet transmission problems silverados (1)
- chevrolet truck vin decoder (2)
- chevrolet truck vin decoder chart (3)
- chevrolet vin decoder (1)
- chevrolet vin decoder chart (2)
- chevrolet vin decoder forum (1)
- chevrolet vin decoder free (1)
- chevrolet vin number decoder (1)
- chevy (4)
- chevy aveo check engine light codes (1)
- chevy aveo check engine light reset (1)
- chevy battery light stays on (1)
- chevy cruze check engine light flashing traction control light on (1)
- chevy equinox check engine light codes (1)
- chevy sonic check engine light reset (1)
- chevy spark check engine light (2)
- chevy spark check engine light flashing (1)
- chevy truck chevrolet vin decoder chart (3)
- chips (1)
- chrysler (2)
- chrysler 300 check engine light (1)
- chrysler check engine light (1)
- chrysler check engine light codes (1)
- chrysler check engine light flashes 10 times (1)
- chrysler check engine light flashing (2)
- chrysler check engine light no code (1)
- chrysler pacifica check engine light (1)
- chrysler vin decoder (1)
- chrysler vin decoder build sheet (2)
- chrysler vin decoder forum (2)
- chrysler vin decoder free (1)
- chrysler vin decoder window sticker (1)
- civic (7)
- civic honda dashboard warning lights symbols (1)
- clean (2)
- cleaner (1)
- code (1)
- codes (1)
- coffee (2)
- coil (1)
- common (1)
- computer (1)
- concrete (1)
- conditioner (2)
- console (1)
- constant (1)
- construction (1)
- control (1)
- conversion (2)
- converter (2)
- convertible (2)
- convertible open collar (1)
- convertible problems (1)
- cooper (1)
- core (1)
- corsa d o2 sensor bank 1 sensor 2 location (1)
- cover (2)
- covers (2)
- cr v honda dashboard warning lights symbols (2)
- crank (1)
- cummins (1)
- curb (1)
- cylinder (1)
- dakota (2)
- damage (1)
- dashboard check engine light symbol (1)
- decorations (1)
- dents (2)
- deville (1)
- diagram (1)
- diesel (2)
- diodes (1)
- dirty (1)
- disc (1)
- disposing (1)
- diy oil change pit (1)
- dodge (7)
- dodge avenger check engine light (2)
- dodge avenger check engine light flashing (1)
- dodge avenger check engine light gas cap (1)
- dodge avenger check engine light no code (2)
- dodge avenger check engine light reset (1)
- dodge challenger check engine light (1)
- dodge charger check engine light (1)
- dodge charger check engine light blinking (1)
- dodge charger check engine light eco mode not working (1)
- dodge charger check engine light oil change (1)
- dodge check engine light (1)
- dodge dakota vin decoder (2)
- dodge dakota vin decoder build sheet (1)
- dodge dart check engine light (1)
- dodge dart check engine light flashing (1)
- dodge dart check engine light gas cap (1)
- dodge dart vin decoder (1)
- dodge durango check engine light (2)
- dodge durango check engine light blinks 10 times (1)
- dodge durango check engine light codes (1)
- dodge durango check engine light flashing (2)
- dodge durango check engine light gas cap (1)
- dodge durango check engine light no codes (2)
- dodge durango check engine light reset (1)
- dodge grand caravan check engine light (2)
- dodge journey battery replacement (1)
- dodge journey battery replacement cost (1)
- dodge journey check engine light (1)
- dodge journey check engine light blinking (1)
- dodge journey check engine light for oil change (1)
- dodge ram check engine light codes (1)
- dodge ram dodge vin decoder chart (1)
- dodge ram vin decoder (1)
- dodge ram vin decoder transmission (1)
- dodge transmission problems cummins (1)
- dodge truck dodge vin decoder chart (1)
- dodge vin decoder (1)
- dodge vin decoder build sheet (1)
- dodge vin decoder chart (1)
- dodge vin decoder forum (1)
- does (1)
- door (2)
- drums (1)
- drying (1)
- durango (1)
- economy (1)
- efficiency (1)
- elantra (1)
- engine (8)
- engine cranks but car won't start (1)
- engine cranks but car won't start in cold weather (1)
- engine cranks but wont start after replacing clutch (1)
- engine cranks but wont start no spark (1)
- engine cranks car cranks but wont start (1)
- engine ford transit van dashboard warning lights symbols (2)
- engine ford vin decoder chart (2)
- erase (1)
- es350 (1)
- exhaust (1)
- explorer (2)
- f150 (2)
- f150 o2 sensor bank 2 sensor 1 location (1)
- f250 (1)
- failure (1)
- fiat 500 obd2 port location (1)
- fiat transmission problems (1)
- fiberglass (1)
- filter (12)
- fish (1)
- flashing check engine light gif (1)
- flat (1)
- flex (1)
- flow (2)
- fluid (4)
- foam (1)
- ford (8)
- ford 10 speed transmission problems ranger (1)
- ford australia vin decoder chart (2)
- ford edge check engine light blinking (1)
- ford edge check engine light codes (1)
- ford edge check engine light comes on and off (1)
- ford edge check engine light flashing (1)
- ford edge check engine light gas cap (1)
- ford explorer check engine light blinking (1)
- ford explorer check engine light flashing (1)
- ford explorer vin decoder chart (1)
- ford f150 o2 sensor bank 2 sensor 1 location (1)
- ford f150 oil change price (1)
- ford f150 vin decoder chart (2)
- ford f150 vin decoder chart 2020 (2)
- ford fiesta check engine light (1)
- ford fiesta check engine light codes (1)
- ford fiesta check engine light flashing (2)
- ford fiesta check engine light oil change (1)
- ford fiesta check engine light reset (1)
- ford focus 1.8 tdci water pump replacement (1)
- ford focus water pump replacement (1)
- ford focus water pump replacement cost (2)
- ford focus water pump replacement cost uk (3)
- ford fusion check engine light codes (1)
- ford mondeo transmission problems (1)
- ford ranger front brake hose replacement (1)
- ford transit check engine light (1)
- ford transit check engine light flashing (1)
- ford transit check engine light reset (1)
- ford transit van dashboard warning lights symbols (2)
- ford transmission problems australia (1)
- ford transmission problems escape (1)
- ford vin decoder chart (1)
- free online auto repair manuals free auto repair diagrams (1)
- from (5)
- front end inner and outer tie rod diagram (1)
- front inner tie rod end (2)
- frontier (1)
- fuel (9)
- funny check engine light meme (1)
- furniture (1)
- gasket (1)
- gear (2)
- gearbox (1)
- generator (1)
- glow (1)
- gmc acadia check engine light (1)
- gmc acadia check engine light blinking (1)
- gmc acadia check engine light codes (1)
- gmc acadia check engine light remote start (1)
- gmc acadia check engine light reset (1)
- gmc check engine light (1)
- gmc check engine light blinking (2)
- gmc check engine light codes (2)
- gmc check engine light flashing (1)
- gmc check engine light reset (1)
- gmc sierra check engine light (1)
- gmc sierra check engine light and traction control (1)
- gmc terrain check engine light (1)
- gmc terrain check engine light flashing (1)
- gmc yukon check engine light (2)
- gmc yukon check engine light flashing (1)
- gmc yukon check engine light reset (1)
- golf (3)
- gram (1)
- grand (1)
- green (1)
- guage (1)
- half yellow check engine light bmw (1)
- handle (1)
- harley (1)
- head (1)
- headlight (3)
- headlight not working bulb ok (1)
- headlights (1)
- heater (1)
- hissing noise brake pedal (1)
- honda (15)
- honda 11 digit vin decoder (1)
- honda accord check engine light codes (1)
- honda accord honda dashboard warning lights symbols (2)
- honda accord vin decoder (1)
- honda atv vin decoder (1)
- honda atv vin decoder canada (1)
- honda check engine light flashing (1)
- honda city dashboard warning lights symbols (2)
- honda civic 2018 key battery replacement (1)
- honda civic battery replacement (1)
- honda civic battery replacement cost (2)
- honda civic battery replacement radio code (1)
- honda civic battery terminal replacement (2)
- honda civic check engine light flashing codes (1)
- honda civic hybrid battery replacement (1)
- honda civic hybrid battery replacement uk (1)
- honda civic key battery replacement (1)
- honda civic paint code location (1)
- honda civic paint code location uk (1)
- honda civic transmission problems (1)
- honda civic transmission problems symptoms (1)
- honda crv check engine light codes (1)
- honda crv check engine light reset (1)
- honda crv honda dashboard warning lights symbols (1)
- honda cvt transmission problems crv (1)
- honda dashboard warning lights symbols (1)
- honda dual clutch transmission problems (1)
- honda fit check engine light codes (1)
- honda fit dashboard warning lights symbols (1)
- honda jazz 2005 paint code location (1)
- honda jazz paint code location uk (1)
- honda motorcycle 11 digit vin decoder (1)
- honda motorcycle vin decoder pre 1980 (1)
- honda odyssey check engine light (1)
- honda odyssey check engine light and vsa light (1)
- honda odyssey check engine light blinking (1)
- honda odyssey check engine light codes (2)
- honda odyssey check engine light flashing (3)
- honda odyssey check engine light flashing and traction control (1)
- honda odyssey check engine light flashing d (2)
- honda odyssey check engine light flashing rough idle (3)
- honda odyssey check engine light low oil (1)
- honda odyssey check engine light reset (2)
- honda pilot check engine light flashing (1)
- honda pilot check engine light flashing d (1)
- honda pilot dashboard warning lights symbols (1)
- honda transmission problems years (1)
- honda transmissions problems (1)
- honda vin number decoder (1)
- honda vin number decoder india (1)
- hood (1)
- horsepower (1)
- hose (1)
- how to check car fuses with a digital multimeter (1)
- how to check car fuses with voltmeter (1)
- how to fix a broken car window motor (1)
- how to fix a broken car window switch (1)
- how to revive a dead car battery (2)
- how to revive a dead car battery baking soda (1)
- how to revive a dead car battery cell (1)
- how to revive a dead car battery epsom salt (1)
- hyundai (4)
- hyundai accent 2013 check engine light (1)
- hyundai accent check engine light car shaking (1)
- hyundai accent check engine light not working (1)
- hyundai check engine light flashing (1)
- hyundai elantra headlight replacement (1)
- hyundai engine air filter replacement (1)
- hyundai genesis alternator replacement (1)
- hyundai getz alternator belt replacement (1)
- hyundai i10 alternator belt replacement (2)
- hyundai i10 alternator replacement (1)
- hyundai interior door handle replacement (1)
- hyundai key fob battery replacement (1)
- hyundai key fob battery replacement 2012 (1)
- hyundai key fob battery replacement 2013 (1)
- hyundai key fob battery replacement 2014 (1)
- hyundai key fob battery replacement 2015 (1)
- hyundai key fob battery replacement 2015 santa fe (2)
- hyundai key fob battery replacement 2016 (1)
- hyundai key fob battery replacement 2017 (1)
- hyundai key fob battery replacement 2018 (2)
- hyundai key fob battery replacement 2019 (1)
- hyundai sonata check engine light blinking (1)
- hyundai sonata check engine light codes (1)
- hyundai spark plug replacement interval (1)
- hyundai starex automatic transmission problems (1)
- hyundai vin decoder 2013 (1)
- hyundai vin decoder forum (1)
- hyundai vin decoder india (1)
- identification ford vin decoder chart (2)
- ignition (2)
- inch (1)
- infiniti vin decoder (1)
- infiniti vin decoder forum (1)
- infiniti vin decoder packages (2)
- infiniti vin decoder window sticker (1)
- injectors (1)
- inner (1)
- inner and outer tie rod diagram (1)
- inner and outer tie rod ends (1)
- inner and outer tie rod replacement cost (1)
- inner tie rod diagram (1)
- inner tie rod end (1)
- inner tie rod end diagram (3)
- inner tie rod end location (1)
- inner tie rod end removal tool (1)
- inner tie rod end replacement (2)
- inner tie rod end replacement cost (2)
- inner tie rod end tool (1)
- inner tie rod removal set (1)
- inner tie rod removal tool advance auto (1)
- inner tie rod removal tool harbor freight (1)
- inner tie rod removal tool rental (1)
- inner tie rod removal tool rental uk (1)
- inner tie rod replacement cost uk (1)
- inner tie rod replacement near me (1)
- inner tie rod replacement tool (1)
- inner tie rod replacement without tool (1)
- inner tie rod tool oreillys (1)
- inner tie rod tool rental (1)
- inner tie rod tool rental advance auto (2)
- inner tie rod tool rental autozone (1)
- inner tie rod tool rental near me (2)
- inner tie rod tool rental nz (1)
- inner tie rod tool rental o'reilly's (1)
- inner tie rod-end on parallelogram steering (2)
- inner tie rod-end on rack-and-pinion steering (2)
- install (2)
- installing (1)
- integra (1)
- intrepid (1)
- isuzu amt transmission problems (1)
- jack (1)
- jaguar e pace key fob battery replacement (1)
- jaguar key fob battery replacement (1)
- jaguar key fob battery replacement s type (1)
- jaguar key fob battery replacement xe (1)
- jaguar key fob battery replacement xf (1)
- jaguar key fob battery replacement xf 2015 (1)
- jaguar key fob battery replacement xj (1)
- jaguar transmissions (1)
- jaguar vin decoder australia (1)
- jaguar vin decoder build sheet (1)
- jaguar vin decoder forum (1)
- jaguar vin decoder uk (1)
- jaguar vin decoder window sticker (1)
- jaguar xf jump start point (1)
- japanese mitsubishi vin decoder (1)
- japanese toyota vin decoder (2)
- jeep (3)
- jeep check engine light meme (2)
- jeep cherokee check engine light codes (1)
- jeep cherokee vin decoder chart (2)
- jeep compass check engine light no codes (1)
- jeep compass check engine light reset (1)
- jeep dashboard warning lights symbols (1)
- jeep grand cherokee check engine light flashing (1)
- jeep grand cherokee check engine light reset (1)
- jeep grand cherokee vin decoder chart (2)
- jeep liberty check engine light (1)
- jeep liberty check engine light blinks 5 times (1)
- jeep liberty check engine light but no code (1)
- jeep liberty check engine light codes (1)
- jeep liberty check engine light flashing (1)
- jeep liberty check engine light gas cap (1)
- jeep liberty check engine light transmission (2)
- jeep patriot check engine light after oil change (1)
- jeep patriot check engine light and traction control (1)
- jeep patriot check engine light gas cap (1)
- jeep patriot check engine light no code (1)
- jeep transmissions by year (1)
- jeep vin decoder (1)
- jeep vin decoder build sheet (1)
- jeep vin decoder chart (1)
- jeep vin decoder forum (1)
- jeep vin decoder free (1)
- jeep vin decoder transmission (1)
- jeep vin decoder window sticker (2)
- jeep wrangler check engine light 2015 (1)
- jeep wrangler check engine light codes (1)
- jeep wrangler check engine light flashes 10 times (1)
- jeep wrangler vin decoder (1)
- jetta (2)
- jobs (1)
- joint (1)
- jumping (1)
- kia check engine light (1)
- kia check engine light codes (1)
- kia check engine light reset (2)
- kia check engine light symbols (2)
- kia forte check engine light (2)
- kia forte check engine light car shaking (1)
- kia forte check engine light codes (2)
- kia forte check engine light reset (1)
- kia ivt transmission problems (2)
- kia optima check engine light (1)
- kia optima check engine light flashing (1)
- kia rio check engine light (1)
- kia rio check engine light codes (1)
- kia seltos vin decoder (1)
- kia seltos vin decoder india (1)
- kia sorento airbag light recall (1)
- kia sorento check engine light (2)
- kia sorento check engine light blinking (1)
- kia sorento check engine light flashing (2)
- kia sorento check engine light loss of power (1)
- kia sorento check engine light reset (1)
- kia soul check engine light (1)
- kia soul check engine light codes (1)
- kia sportage check engine light (1)
- kia sportage check engine light flashing (1)
- kia transmission problems (1)
- kia vin decoder trim level (1)
- knock (1)
- land (1)
- land rover check engine light (1)
- land rover check engine light codes (1)
- land rover check engine light flashing (1)
- land rover check engine light reset (1)
- land rover vin decoder uk (1)
- lead (1)
- leaking (2)
- legend (1)
- lens (1)
- lexus (6)
- lexus check engine light (1)
- lexus check engine light blinking (1)
- lexus check engine light codes (2)
- lexus check engine light trac off (1)
- lexus check engine light vsc (1)
- lexus check engine light vsc trac off (1)
- lexus is250 check engine light (2)
- lexus is250 check engine light and traction control (3)
- lexus is250 check engine light flashing (2)
- lexus is250 check engine light reset (1)
- lexus is250 check engine light vsc (1)
- lexus rx 350 check engine light (1)
- lexus rx 350 check engine light blinking (1)
- lexus rx 350 check engine light flashing (1)
- lexus vin decoder build sheet (1)
- lexus vin decoder japan (1)
- license (2)
- life (1)
- lift (1)
- light (5)
- lights (1)
- lincoln (2)
- lincoln check engine light (1)
- lincoln check engine light codes (1)
- lincoln vin decoder chart (1)
- located (1)
- location (1)
- magic (1)
- make a double flare brake line (1)
- malfunction indicator honda dashboard warning lights symbols (2)
- malfunction indicator nissan check engine light codes (1)
- malibu (1)
- manual (6)
- marine (1)
- mass (1)
- master (1)
- maxima (1)
- mazda (1)
- mazda 3 o2 sensor bank 1 sensor 2 (1)
- mazda 3 o2 sensor bank 1 sensor 2 location (1)
- mazda automatic transmission problems (1)
- mazda vin decoder free (1)
- mazda vin decoder japan (1)
- mazda vin decoder uk (1)
- measure (1)
- mercedes (1)
- mercedes active headlamps light system inoperative (1)
- mercedes benz c200 dashboard warning lights (1)
- mercedes benz dashboard warning lights meaning (1)
- mercedes benz sprinter oil change interval (1)
- mercedes benz sprinter van dashboard warning lights (1)
- mercedes benz water pump replacement cost (1)
- mercedes brake hose replacement (1)
- mercedes serpentine belt replacement cost (1)
- mercedes-benz radiator replacement (1)
- mildew (1)
- mini (1)
- mitsubishi (1)
- mitsubishi canter dashboard warning lights (2)
- mitsubishi canter vin number location (2)
- mitsubishi check engine light (1)
- mitsubishi dashboard warning lights (1)
- mitsubishi dashboard warning lights meaning (1)
- mitsubishi fuso duonic transmission problems (1)
- mitsubishi fuso transmission problems (1)
- mitsubishi l200 dashboard warning lights manual (1)
- mitsubishi l200 vin number location (1)
- mitsubishi l300 dashboard warning lights (2)
- mitsubishi l300 vin number location (2)
- mitsubishi lancer dashboard warning lights (2)
- mitsubishi lancer vin number location (1)
- mitsubishi mirage check engine light (1)
- mitsubishi pajero dashboard warning lights (1)
- mitsubishi pajero mini problems (1)
- mitsubishi pajero pajero dashboard warning lights meaning (2)
- mitsubishi pajero starting problems (1)
- mitsubishi pajero vin number location (1)
- mitsubishi transmission problems (1)
- mitsubishi truck dashboard warning lights symbols (1)
- mitsubishi vin decoder forum (1)
- mitsubishi vin decoder philippines (1)
- mitsubishi vin number location (1)
- mk7 ford transit van dashboard warning lights symbols (1)
- model (1)
- mopar (1)
- motor (1)
- mount (1)
- much (1)
- mustang (2)
- navigator (1)
- nissan (7)
- nissan altima check engine light (1)
- nissan altima check engine light codes (3)
- nissan check engine light codes (1)
- nissan check engine light codes without a scanner (2)
- nissan check engine light flashing (2)
- nissan check engine light reset (1)
- nissan frontier check engine light codes (2)
- nissan patrol vin decoder (1)
- nissan patrol vin decoder australia (1)
- nissan rogue check engine light (1)
- nissan rogue check engine light codes (2)
- nissan rogue check engine light reset (1)
- nissan sentra check engine light blinking (1)
- nissan sentra check engine light reset (1)
- nissan transmission problems rogue (1)
- nissan versa check engine light flashing (1)
- nissan versa check engine light reset (1)
- nissan vin decoder chart (1)
- nissan vin decoder japan (1)
- noco 4000 amp jump starter (1)
- noco battery jump starter (1)
- noco battery jump starter gb150 (1)
- noco boost ultrasafe jump starter (1)
- noco boost ultrasafe jump starter kit (1)
- noco boost ultrasafe jump starter kit gb10 (1)
- noco boost ultrasafe jump starter sam's club (1)
- noco gb70 boost hd jump starter (1)
- noco genius boost jump starter (2)
- noco genius boost jump starter gb70 (1)
- noco genius boost jump starter reviews (1)
- noco genius boost jump starter stores (1)
- noco genius jump starter (2)
- noco genius jump starter 24v (2)
- noco genius jump starter amazon (1)
- noco genius jump starter gb40 (1)
- noco genius jump starter review (2)
- noco jump starter (1)
- noco jump starter gb150 (1)
- noco jump starter gb40 (2)
- noco jump starter gb40 instructions (1)
- noco jump starter gb40 manual (2)
- noco jump starter gb40 review (1)
- noco jump starter gb70 (2)
- noco jump starter gb70 warranty (1)
- noco portable jump starter (1)
- obd2 scanner subaru (1)
- obd2 scanner subaru forester (1)
- obd2 scanner subaru outback (1)
- odor (1)
- odyssey (1)
- oem inner tie rod tool (1)
- oem inner tie rod tool kit (1)
- oil change diy cost (1)
- oil change diy or pay (1)
- oldsmobile (1)
- one headlight dimmer than the other (1)
- open convertible gta 5 (1)
- open hood subaru ascent (1)
- open hood subaru crosstrek (2)
- open hood subaru crosstrek 2019 (2)
- open hood subaru forester (1)
- open hood subaru impreza (1)
- open hood subaru legacy (1)
- open hood subaru outback 2018 (1)
- open hood subaru outback 2019 (1)
- open hood subaru outback 2020 (1)
- order (1)
- outback (2)
- owners (1)
- oxygen (1)
- p0141 o2 sensor heater circuit bank 1 sensor 2 (1)
- pack (1)
- pads (2)
- paint (3)
- parallel (1)
- pascals (1)
- passat (1)
- peugeot 307 transmission problems (1)
- peugeot key fob battery replacement (1)
- peugeot vin decoder europe (1)
- pickup (1)
- pinion (1)
- pittsburgh (1)
- plastic (1)
- plate (1)
- plug (5)
- pontiac (2)
- porsche cayenne psm failure (1)
- porsche cayenne psm failure check engine (1)
- porsche cayenne psm failure light (1)
- porsche cayenne psm failure reset (1)
- porsche cayenne psm failure won't start (2)
- porsche cayenne psm failure workshop (1)
- porsche check engine light codes (1)
- porsche transmission problems (1)
- porsche vin decoder australia (1)
- porsche vin decoder build sheet uk (1)
- porsche vin decoder options (1)
- porsche vin decoder options list (1)
- porsche vin decoder uk (1)
- position (2)
- power (3)
- powertrain ford transit van dashboard warning lights symbols (1)
- prelude (1)
- pressure (2)
- problems (14)
- procedure (1)
- program audi key fob with one key (1)
- program cadillac key fob (1)
- program lexus garage door opener (1)
- program lexus garage door opener without remote (2)
- program lexus garage door opener without remote 2019 (2)
- pump (2)
- quad (1)
- quotes (1)
- racing (1)
- radiator (3)
- radio (2)
- ranch (1)
- ranger (1)
- rear (2)
- recharge (1)
- red flashing temperature light vw polo (1)
- refining (1)
- registration (1)
- regulator (1)
- remote start a lexus (1)
- removal (4)
- remove (5)
- removing (2)
- renault vin decoder (1)
- renault vin decoder france (1)
- renault vin decoder kiev (2)
- renault vin decoder south africa (1)
- renault vin decoder uk (1)
- renew (1)
- repair (5)
- repair guides free online auto repair manuals free auto repair diagrams (1)
- replace (2)
- replace audi battery (1)
- replace audi key battery (1)
- replace audi key battery 2017 (1)
- replace audi key battery 2018 (1)
- replace cadillac key fob battery (1)
- replaced (1)
- replacement (9)
- replacing (1)
- reset volvo service light (1)
- reset volvo service light v40 (1)
- resin (1)
- restore bmw headlights (1)
- review (1)
- right inner tie rod diagram (1)
- rims (3)
- rods (1)
- rotors (1)
- rover (1)
- runner (2)
- rx300 (1)
- seat (1)
- sensor (6)
- sentra (1)
- serpentine (1)
- shields (1)
- shoes (1)
- should (1)
- signs of bad ignition coil (1)
- signs of bad ignition coil on atv (1)
- signs of bad ignition coil on car (1)
- signs of bad ignition coil on motorcycle (1)
- signs of bad ignition coil pack (1)
- signs of bad ignition coil riding mower (1)
- silverado (1)
- size (2)
- skoda vin decoder equipment (1)
- skoda vin decoder options (1)
- skylark (1)
- small (1)
- smells (1)
- solenoid (1)
- spark (4)
- specs (8)
- spectra (1)
- sportster (1)
- sprinter (1)
- stain (2)
- standard (1)
- starter (1)
- starting (1)
- steering (2)
- steering wheel shakes when braking front or rear rotors (1)
- steering wheel shakes when braking hard (1)
- steering wheel shakes when braking not rotors (1)
- stratton (1)
- subaru (1)
- subaru open hood (1)
- subaru outback open hood (1)
- subaru transmission problems cvt (1)
- subaru vin decoder color (1)
- suffix (1)
- supercharger (1)
- suzuki (1)
- suzuki check engine light codes (1)
- suzuki dirt bike vin decoder (1)
- suzuki motorcycle vin decoder (1)
- suzuki motorcycle vin decoder uk (1)
- suzuki motorcycle vin number decoder (1)
- suzuki motorcycle vin number decoder australia (1)
- suzuki swift check engine light reset (1)
- suzuki vin decoder (1)
- suzuki vin decoder atv (1)
- suzuki vin decoder australia (1)
- suzuki vin decoder forum (2)
- suzuki vin decoder parts (1)
- suzuki vin decoder year (1)
- symbol check engine light logo (1)
- symptoms (6)
- symptoms of a bad catalytic converter chevy (1)
- symptoms of a bad catalytic converter chevy silverado (1)
- symptoms of a bad catalytic converter nissan altima (1)
- symptoms of a bad fuel pump control module (1)
- symptoms of a bad fuel pump regulator (1)
- tahoe (1)
- tail (3)
- tank (1)
- taurus (3)
- tensioner (1)
- tesla model 3 rear brake pad replacement (1)
- tesla vin decoder autopilot (1)
- test charging system with multimeter (1)
- testing (3)
- texas (1)
- thermostat (1)
- time (1)
- timing (2)
- tint (1)
- tire (5)
- tires (2)
- tool (1)
- torque (4)
- touching (1)
- towels (1)
- toyota (4)
- toyota camry check engine light (1)
- toyota camry check engine light blinking (1)
- toyota camry check engine light gas cap (1)
- toyota camry check engine light on and off (1)
- toyota camry hood open (1)
- toyota check engine light (1)
- toyota check engine light codes (2)
- toyota corolla 2009 check engine light (1)
- toyota corolla 2017 check engine light (1)
- toyota corolla check engine light reset (1)
- toyota corolla open hood (1)
- toyota mr2 open hood (1)
- toyota open hood (1)
- toyota prius check engine light (2)
- toyota prius check engine light codes (3)
- toyota prius check engine light diagnosis (1)
- toyota prius check engine light gas cap (1)
- toyota prius check engine light reset (2)
- toyota rav4 check engine light (1)
- toyota rav4 check engine light flashing (1)
- toyota rav4 check engine light reset (1)
- toyota sienna check engine light (2)
- toyota sienna check engine light and vsc (1)
- toyota sienna check engine light blinking (1)
- toyota sienna check engine light codes (1)
- toyota sienna check engine light reset (1)
- toyota sienna check engine light trac off (1)
- toyota sienna check engine light trac off awd (1)
- toyota sienna check engine light vsc trac off (1)
- toyota tacoma check engine light (1)
- toyota tacoma check engine light and traction light (1)
- toyota tacoma check engine light and traction light limp mode (2)
- toyota tacoma check engine light blinking (1)
- toyota tacoma check engine light codes (1)
- toyota tacoma check engine light gas cap (1)
- toyota vin decoder (1)
- toyota vin decoder build date (2)
- toyota vin decoder chart (1)
- toyota vin decoder europe (1)
- toyota vin decoder forum (1)
- toyota vin decoder japan (2)
- toyota vin decoder options (1)
- toyota vin decoder uk (1)
- toyota vin number decoder (1)
- toyota vios hood open (1)
- toyota yaris check engine light (2)
- toyota yaris check engine light codes (1)
- toyota yaris check engine light reset (1)
- trailer (1)
- transfer (1)
- transit custom ford transit van dashboard warning lights symbols (1)
- transmission (8)
- trickle (2)
- troubleshooting (1)
- truck (1)
- truck chevrolet chevy truck vin decoder chart (1)
- trunk (1)
- tube (1)
- tubeless (1)
- turbonetics (1)
- type (1)
- types (1)
- upholstery (1)
- urine (2)
- used (1)
- uses (1)
- valve (4)
- vehicle (1)
- vin decoder ford engine sizes chart (1)
- vin decoder identification ford axle code chart (1)
- vin identification dodge vin decoder chart (1)
- vin lookup gmc vin decoder chart (1)
- vin number gmc vin decoder chart (1)
- vintage suzuki motorcycle vin number decoder (1)
- viper (1)
- volkswagen check engine light blinking car shaking (1)
- volkswagen check engine light codes (1)
- volkswagen check engine light meme (1)
- volkswagen dashboard warning lights meaning (1)
- volkswagen golf dashboard warning lights (1)
- volkswagen jetta check engine light flashing (1)
- volkswagen polo dashboard warning lights (1)
- volkswagen transmission problems (1)
- volt (1)
- volvo (1)
- volvo c70 convertible problems (1)
- volvo check engine light (1)
- volvo check engine light codes (2)
- volvo check engine light flashes 8 times (1)
- volvo check engine light flashing (2)
- volvo check engine light no codes (1)
- volvo check engine light reset (1)
- volvo check engine light slow down or shift up (1)
- volvo instrument cluster problems (1)
- volvo s40 check engine light (1)
- volvo side view mirror replacement (1)
- volvo v50 open hood (1)
- volvo vin decoder (1)
- volvo vin decoder color (1)
- volvo vin decoder forum (2)
- volvo vin decoder options (1)
- volvo vin decoder paint code (1)
- volvo vin decoder s60 (1)
- volvo vin decoder v60 (1)
- volvo vin decoder xc40 (1)
- volvo vin decoder xc60 (1)
- volvo vin decoder xc90 (1)
- volvo won't start after battery disconnect (1)
- volvo won't start but lights come on (1)
- volvo won't start immobilizer (1)
- volvo wont start in cold (1)
- volvo xc60 check engine light (1)
- volvo xc60 check engine light codes (1)
- volvo xc90 check engine light (2)
- volvo xc90 check engine light flashing (1)
- volvo xc90 check engine light flashing slow down or shift up (2)
- volvo xc90 check engine light reset (2)
- vw abs light on and off (1)
- vw beetle vin number location (1)
- vw check engine light meme (1)
- vw key fob battery replacement (1)
- vw key fob battery replacement 2007 (2)
- vw key fob battery replacement 2013 (2)
- vw key fob battery replacement 2015 (2)
- vw key fob battery replacement 2016 (1)
- vw key fob battery replacement 2018 (2)
- vw key fob battery replacement cost (1)
- vw key fob battery replacement passat (1)
- vw polo abs light on and off (1)
- vw polo abs light on dash (1)
- vw polo abs light stays on (1)
- vw steering angle sensor reset (1)
- vw steering angle sensor reset vcds (1)
- vw temperature light flashing red (1)
- vw turbocharger boost sensor (1)
- vw vin decoder free (1)
- vw vin decoder options (1)
- vw vin decoder options list (1)
- vw vin decoder transmission (1)
- wagon (1)
- warning lights ford dashboard symbols (1)
- warning lights mitsubishi pajero dashboard symbols (2)
- warning lights on dashboard mercedes benz (1)
- water (2)
- what (4)
- what causes a blown head gasket (1)
- what causes a blown head gasket in a prius (1)
- where (1)
- where to find bmw vin number (1)
- which (1)
- window (4)
- windshield (6)
- wiper (3)
- wipers (2)
- wire (1)
- wires (1)
- wiring (1)
- wiring diagram free online auto repair manuals free auto repair diagrams (2)
- with (3)
- wonderful (1)
- work (1)
- working (1)
- workshop manuals free online auto repair manuals free auto repair diagrams (1)
- wrangler (1)
- wraps (1)
- xterra (1)
- year ford vin decoder chart (1)
Featured Post
wonderful quotes from it's a wonderful life
The 50 Most Wonderful Quotes from It's a Wonderful Life . Zuzu Bailey quotes 1. "Every time a bell rings, an angel gets his w...

